Monday, October 23, 2017

Keeping in-sync with Salesforce


Keeping two or more data stores in-sync is always a fun task. With the help of Apache NiFi and some decently tooling, I've been able to craft up a solution here at Looker that allows us to easily keep our Salesforce data in-sync and up-to-date in Google Big Query. We've been running this in production for close to a year now, and it's proven to be very flexible and rather solid. In this post I'll cover how we accomplish this.


Before going into the plumbing details, here's a very high overview of the process.


1. Extract the data from Salesforce, either incremental or full exports.

2. Use NiFi's Record Reader and a Record Writer Controller Services to transform the data from CSV to JSON.
3. Load the data into Google Big Query.

Below is a high level overview


Extraction Flow


Plumbing


The first task was to get data out of the Salesforce in a fast and reliable manner.  After researching both the REST/SOAP based API and Dataloader, it seemed that the Dataloader would be the right tool for our use case.  Data Loader is a client application for the bulk import or export of data. It can be used to insert, update, delete, or export Salesforce records.  I will not cover the details of getting the Dataloader setup, it's covered pretty well in the Developer Guide


When running Dataloader in batch mode, you provide a configuration directory that contains the necessary config.properties, log-conf.xml, and the process-conf.xml files.  All of our Salesforce extract processes share the same config.properties and log-conf.xml, so those are easily symlinked to a shared location.  The interesting component that drives what data is extracted is contained in the process-conf.xml file. The process-conf.xml file contains the information that Dataloader needs to process a "bean". Each process-conf.xml file refers to a single process such as an insert, upsert, export, and so on. Therefore, this file can contain multiple processes.  One of the parameters that you can configure with each bean is the sfdc.extractionSOQL which allows valid SOQL (Salesforce SQL) to be ran for that bean. Wanting to have the extractionSOQL be driven at runtime, and not hardcode into the process-conf.xml, I opted to leveraged xsltproc since we're dealing with XML files. I use xsltproc currently to manage and manipulate Hadoop XML configurations files via Ansible, so I knew it was the right tool for the job. Xsltproc is a command line tool for applying XSLT documents which allow parsing of XML and various tree manipulations. With xsltproc, you provide an output file, a XSLT transformation, and an existing XML file to do the transformation on. In addition, you can pass a parameters into the XSLT Transformation via the --stringparam argument.  For example, running the command below, the extractionSOQL parameter defined in the XSLT would be overriden by the command line argument.


xsltproc --timing --stringparam extractionSOQL 'SELECT foo FROM bar WHERE baz = "green"' -o conf/bar/process-conf.xml xsl/bar.xsl conf/nifi-process-conf-master.xml


<xsl:param name="extractionSOQL" select="'Select Foo FROM Bar'"/>

<xsl:template match="@*|node()">
  <xsl:copy>
    <xsl:apply-templates select="@*|node()" />
  </xsl:copy>
</xsl:template>

<xsl:template match="bean[@id='BarExtract']/property[@name='configOverrideMap']/map">
  <xsl:copy>
    <xsl:apply-templates select="@*|node()"/>
    <entry key='sfdc.extractionSOQL' value="{$extractionSOQL}" />
 </xsl:copy>
</xsl:template>

And we would generate a process.conf.xml file that could be feed to the Dataloader to do the extract.


  <bean id="BarExtract" class="com.salesforce.dataloader.process.ProcessRunner" singleton="false" lazy-init="default" autowire="default" dependency-check="default">
    <description>Foo Extract</description>
    <property name="name" value="Lead"/>
    <property name="configOverrideMap">
      <map>
        <entry key="sfdc.entity" value="Foo"/>
        <entry key="process.operation" value="extract"/>
        <entry key="process.mappingFile" value="/opt/nifi-common/scripts/salesforce/dataloader/mapping-files/Foo.sdl"/>
        <entry key="dataAccess.type" value="csvWrite"/>
        <entry key="sfdc.extractionSOQL" value="SELECT Foo FROM Bar WHERE baz = 'green'"/>
      </map>
    </property>
  </bean>


Now that we're exporting the data out of Salesforce in CSV format, the next piece of the puzzle is to convert that CSV data into JSON data so we can load it into Google Big Query.  A combination of the FetchFile -> UpdateAttribute -> QueryRecord take care of the heavy lifting. QueryRecord processor allows us to set a Record Reader and Record Writer.  In our case, we're using the  CSVReader and JSONRecordSetWriter.  These allow use to map/convert the CSV data to JSON fairly easily.


From there we prep the JSON for Big Query by running it through a simple JQ filter, compress and store the results in Google Cloud Storage. The flowfile is then passed out of the Salesforce processor and routed to the processor group responsible for loading the data into Google Big Query.


Scheduling


Once all the necessary flows were wired together, we scheduled them to run via the use of a GenerateFlowFile with some custom JSON text.  Additionally we have a HandleHttpRequest listening for adhoc request to kick off and run of the flow.  When the GenerateFlowFile triggers a creation, it's routed the an EvalutateJsonPath processor which extracts all the needed JSON values into flowfile attributes.


For example, within the GenerateFlowFile CustomText section, the following is added which will generate the necessary JSON to extract all the data from the Bar Object/Table that was modified within the last 30 minutes and is not deleted. 


{"http.headers.looker_bq_write_disposition":"WRITE_APPEND","http.headers.looker_table":"Bar","http.headers.looker_SOQL":"Select foo FROM Bar WHERE IsDeleted = false AND SystemModstamp > ${now():toNumber():minus(1800000):format("yyyy-MM-dd'T'HH:mm:ss'Z'","GMT")}"}


So there you have it, Bob's your uncle


Friday, May 26, 2017

Kickin' the tires on NiFi's Wait/Notify Processors


With the release of NiFi 1.2 a number of new processors were introduced, including the Wait/Notify, and GCSObject processors. The Notify processor allows you to cache a value, called a release value, in the Map Cache Server. The Map Cache Server is primarily used to store lookup values and for keeping user-defined state.  Using the Notify along with the Wait processor, you can hold up the processing of a particular flow until a "release signal" is stored in the Map Cache Server. This is very useful with a number of various ETL flows.

The initial flow that I planned on applying these processors to is the Zendesk Chat service to extract both individual chat messages and session information.  I've previously written about how we're currently processing chats.  Although this has been working fine, it does require a dependency on a third party database sync process from Zendesk to Redshift, which only runs once an hour. By being able to process the chats directly from the Zendesk, Looker's Department of Customer Love (DCL) is able to get quicker chat metrics along with cutting out the middleman and removing an integration point. Now were able to load directly into Google Big Query at a much quicker cadence. So let's get to the meat of things.....

The high level overview of the flow is as follows:
  • Trigger the event flow for a given date range.
  • Extract all the chat "sessions" for the given range, may require a looping construct.
  • Query and get all the messages for the given "sessions".
  • Load into Google Cloud Storage.
  • Load into Big Query.

I won't cover in detail the first step of triggering the flow, but essentially we use a combination of HandleHttpRequest and GenerateFlowFile processors.  The HandleHttpRequest allows us to process a given range of dates in an ad-hoc manner, whereas the GenerateFlowFile allows for scheduling the flow via a cron expression and/or run every X seconds/minutes...

Once we have the date range, the next part is to get all the "sessions" from the API.  We don't know ahead of time how many chats we'll have, so we'll need to factor in the need to handle pagination and some sort of looping construct.  The search API returns a next_url if there are more chats for the given range. In that case, we'll need to loop around and get the next batch of sessions.  This will continue until the next_url is NULL.  Below is the flow we're using to get all the chats for a given date range.


Since we need to be careful to not exceed the rate limit for the API, a delay is implemented that throttles each call to the search API. With each iteration, the HTTP response is a JSON object that has a results array. The results array includes a url of the chat, a starting timestamp, a preview message, a type attribute, and an id of the chat session. It's rather easy to extract out all the ids from the results array using JQ.


Next all the "pages of chat sessions" are sent downstream to a MergeContent processor which will merge them into a single FlowFile.  Once all the session ids are merged, we then immediately split the entire group via the SplitText processor into chunks of 50 (the Zendesk API limit).  Now we've set the stage to use the bulk chat API to efficiently extract the session messages.


The SplitText processor provides some useful attributes that we'll use in the Wait processor.  The key one in this flow is the fragment.count. Each FlowFile resulting from the split will have a fragment.index attribute which indicates the ordering of that file in the split and a fragment.count which is the number of splits from the parent. For example, if we have 120 sessions to process, and we split those into 50 sessions per chunk, we will have three chunks.  Each one of these FlowFiles will have a fragment.count that is equal to three, and each one will have a fragment.index that is a index value in the split.  The original FlowFile is sent off to the Wait processor, which we'll discuss later, and all the merged/split data is sent downstream for processing.

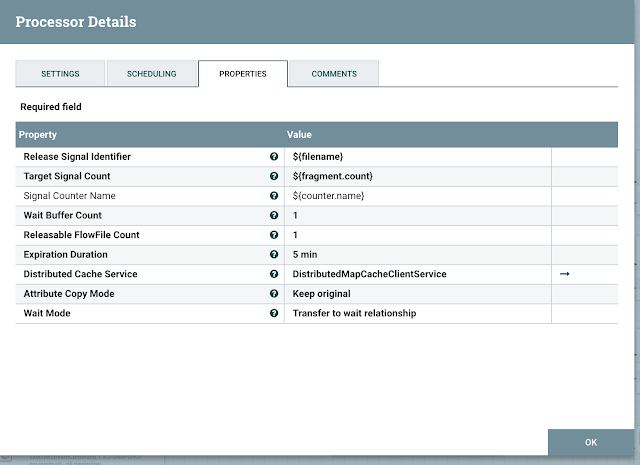
Each "chunk of 50" works their way through the flow and eventually is written to Google Cloud Storage via the new PutGCSObject processor.  The success relationship of the PutGCSObject is routed to the Notify processor, which in-turn updates the DistrbutedMapCacheServer. The value being updated in the DistrbutedMapCacheServer is the Signal Counter Name, and the delta being applied to the update is the Signal Counter Delta. So for each file written successfully, the Signal Counter Name is incremented by 1.


Notify Processor properties

Now we need to back up a bit in the flow to the SplitText processor labelled "chunk chats", we can see a fork in the processing.  This is where we setup the Wait processor. The original FlowFile will sit and Wait for the appropriate "release signal" to be written to the DistrbutedMapCacheServer before proceeding.  Once the "release signal" is detected, the FlowFile will be routed to the success queue which is sent on to the Processor Group that will load the data into a Google BigQuery partitioned table.  In the event that one or more of the files are not successfully written to Google Cloud Storage, the original FlowFile in the wait queue will eventually (10 min default) expire. This will result in FlowFile being routed to the expired queue where we route that to a Amazon SNS Topic that will notify me.


Wait Processor properties


I really enjoy the flexibility of being able to adjust and change workflows so easily in NiFi. The addition of the Wait/Notify processors are great additions to NiFi and further expands and extends the usefulness of NiFi. I keep finding more and more ways to leverage NiFi for our ETL and data processing needs.


So there you have it, Bob's your uncle

Monday, February 13, 2017

More Apache NiFi fun...


In my last post, I briefly went over some basic extraction transformation and load processing (ETL) that I've began doing with Apache Nifi. As I begin to tackle more and more of migrating our old ETL processes to NiFi,  I decided now was the time to invest in getting a NiFi cluster running. We're going all in with NiFi, it's proving itself very capable and flexible.  By employing a NiFi cluster, it’s possible to have increased processing capability along with a single interface through which to make changes and to monitor various dataflows. Clustering allows changes to be made only once, and that change is then replicated to all the nodes of the cluster. Through the single interface, we may also monitor the health and status of all the nodes.

NiFi Cluster

NiFi employs a Zero-Master Clustering model. Each node in the cluster performs the same tasks on the data, but each operates on a different set of data. One of the nodes is automatically elected (via Apache ZooKeeper) as the Cluster Coordinator. All nodes in the cluster will then send heartbeat/status information to this node, and this node is responsible for disconnecting nodes that do not report any heartbeat status for some amount of time. Additionally, when a new node elects to join the cluster, the new node must first connect to the currently-elected Cluster Coordinator in order to obtain the most up-to-date flow.

Although it's beyond the scope of this post, I used Ansible to spin up and configure all the necessary nodes and cluster configuration.  Without some sort of orchestration tool like this, you're pretty much doomed from the beginning.  Currently we have a cluster of three nodes that's handling a number of data flows between a variety of systems including S3, Redshift, MySQL and Google Big Query.  The images below show the main canvas page for this cluster.


A few NiFi terms will help with the understanding of the various things that I'll be discussing below. I lifted these straight from the NiFi documentation:
  • Flowfile- represents each object moving through the system and for each one, NiFi keeps track of a map of key/value pair attribute strings and its associated content of zero or more bytes.
  • Processors- actually perform the work, and with Nifi 1.1.x there's currently 188 of them.
  • Processor Group- is a specific set of processes and their connections, which can receive data via input ports and send data out via output ports. In this manner, process groups allow creation of entirely new components simply by composition of other components.

I tend to leverage Process Groups quite a bit.  They allow one to logically organize various Processors and can either be Local and/or what's called a Remote Process Groups (RPG).  As your flows get more complicated, you'll most certainly want to leverage Process Groups to at least organize and compartmentalize the various Processors. RPGs allow you to send data to different clusters or to different machines within the same cluster. In our setup, we're employing a RPG to spread out out the data processing to the various nodes within the same cluster. Once we source the data from the primary node, the Flowfiles are sent via a RPG to their respective downstream processors and processor groups, which in turn distribute work to a given node in the cluster.


I'm briefly going to cover one of our dataflows; the Zendesk Chat sync. Let's take the red pill and follow the chat event extract and downstream flows. This process extracts our the Zendesk chats and parses the conversation into individual chat lines.  These are then loaded into Redshift and Google Big Query.  The high level steps are as follows:

1. Extract raw events from the zendesk._ticket_comments table for a given date

2. Convert the raw chat lines into individual chat lines. I covered this process in a previous blog post here.

3. Format the chats in JSON for loading into Redshift and Google Big Query

4. Load into Redshift and Google Big Query


Drilling into the Process Group labelled ZendeskExtract, we see the details of the extract process.


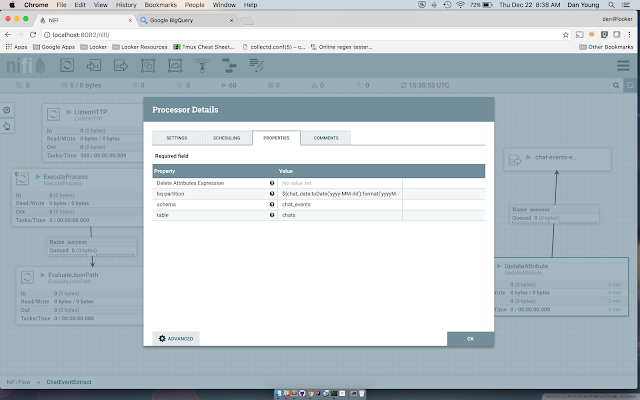
As you see, there's a variety of components on the canvas, these are called "processors". Processors actually perform the work and with Nifi 1.1.x there's currently 188 of them. Most of what you need to do is available out of the box and requires little or no coding.  A processor does some combination of data routing, transformation, or mediation between systems. Processors also have access to attributes of a given FlowFile and its content stream. The processor can either commit its work or rollback. Below is an example of the UpdateAttributes processor which updates the attributes for a FlowFile by using the Attribute Expression Language.


For this given flow, we run it every 30 minutes and it is triggered via the GenerateFlowFile processor.  GenerateFlowFile allows you to either generate empty Flowfiles for testing, or as in our case, a Flowfile with custom input text.  Since you can parameterize an ExecuteSQL processor with attributes from a Flowfile, I inject the JSON attribute chat_date into the body of the Flowfile. This will become an attribute that later on becomes a predicate for the SQL statement ran by the downstream ExecuteSQL processor. For example:


{"chat_date":"2017-02-10"}


This Flowfile is then passed downstream to the EvaluateJsonPath and UpdateAttribute processors before reaching the zendesk-output port.  These processors are used to extract the chat_date from the Flowfile along with setting a number of attributes used in downstream processing.


At this stage in the ETL flow, we're ready to actually run the queries to extract the data from the database.  Since we have a cluster of nodes, we want to be able to execute the SQL on any of the nodes. This is important since when data is sourced, we need to ensure that only one node for a given SQL statement is running the query, otherwise we'll get duplicates. For the chat-event, we only generate a single Flowfile every 30 minutes, so this is fine.  With the GenerateTableFetch processors, I specify a PartitionSize for each table.  The GenerateTableFetch processor will generate flow files containing SQL statements with different offset and limit predicates.  Each Flowfile will then be sent to the cluster and assigned to run on a single node via an ExecuteSQL processor.  For example, the SQL might look like this:


SELECT * FROM zendesk._ticket_history WHERE id > 244779086088 ORDER BY id LIMIT 200000

Example of the ExecuteSQL running on different nodes within the cluster


All the Zendesk tables are sent to the same processor group and generally follow the same path.  The Chats do require a couple of extra steps of transformation along with the newly transformed data being loaded back into Redshift along with Google Big Query. This parallel execution path is needed as we develop the necessary LookML for transitioning from Redshift to Google Big Query. Once the transition is complete, we can simply turn off the path that loads to Redshift without every disrupting the path to Google Big Query. This transformation path is handled via routing.


So a FlowFile that has the looker_table attribute of chats, it will be routed to the parse chats processor.  From here the FlowFile makes its way down to the formatting processor before it is sent back into the Big Query and Redshift flows.


The next few steps in the flow are pretty boring.  With Redshift path we compress the Flowfile content, write to S3 and load into Redshift via a COPY command. The Google Big Query path we compress the JSON and write to disk along with a metadata file that contains all the JSON needed to provide the necessary information for loading into Google Big Query. The final steps in the flow are fairly straightforward. We read in the metadata file, extract the needed JSON into a FlowFile attribute, route the loading to partitioned vs. non-partitioned tables, and finally load the data via the Big Query command line tool


Data Provenance


One of the most important features of NiFi IMHO is built in support for data provenance. Data provenance documents the inputs, entities, systems, and processes that influence data of interest, in effect providing a historical record of the data and its origins. For each processor within NiFi, one can click on the component and inspect the data provenance.

For example, let's look at the data provenance for the ExecuteScript processor that loads the chat events into a Google Big Query partitioned. The data provenance can be accessed by right clicking on the processor and select the Data Provenance.


If we look at the details of an event, and then the Content tab, we can inspect both the input and output claim. The input claim in this example is a Flowfile with the metadata specifying what file that will be loading into Google Big Query.


{
  "JSONAttributes": {
    "looker_egress_path": "/opt/nifi-working/zendesk/chat-events-egress-to-bq/",
    "looker_table_key": "",
    "looker_schema": "chat_events",
    "looker_temp_schema": "",
    "looker_bq_write_disposition": "WRITE_TRUNCATE",
    "looker_egress_file": "1698334643841923.gz",
    "looker_table": "chats",
    "looker_bq_partition": "20170213",
    "looker_temp_table": ""
  }
}

The output claim will have the output of the Big Query load


Upload complete.
Waiting on bqjob_r67aaeabc3cb7ebe7_0000015a379d509e_1 ... (0s) Current status: RUNNING
                                                                                      
Waiting on bqjob_r67aaeabc3cb7ebe7_0000015a379d509e_1 ... (1s) Current status: RUNNING
                                                                                      
Waiting on bqjob_r67aaeabc3cb7ebe7_0000015a379d509e_1 ... (1s) Current status: DONE   


Data provenance is extremely important in any ETL pipeline/job. As things get more complex it becomes even more critical to gain insight into what's going on along the way. There's a number of other really important and useful attributes of Apache NiFi that I'll cover in later posts.  But if you need to move bits from A to B, then you should really consider investing some time into learning more about how to leverage NiFi.


So there you have it, Bob's your uncle

Tuesday, January 3, 2017

Apache NiFi


Recently I decided to start the process of migrating our internal ETL processes over to Apache NiFi.  As with most companies, ETL scripts seem to get scattered all over the place over time. It becomes rather challenging to not only know what's running where and when, but also gaining visibility into various execution and dependencies of these flows becomes hard.  I've been very pleased with the flexibility and broad features/functionality that's provided with NiFi.  There are hundreds of builtin processors that cover most ETL needs.  If you do find yourself needing functionality that's not provided, one can easily extended functionality for example by using the ExecuteScript processor to wrap existing ETL code.

It was rather easy for me to port my existing Drake workflows over to NiFi.  In this post, I'll focus at a high level on one workflow, our Zendesk Chat Parser.  This ETL flow essentially extracts Zendesk chat data from Salesforce, parses and formats the chats, and then loads it into Google Big Query.

At the top level, there are three Processor Groups, which are solely used for logically organizing the Flows.  The first flow extracts the raw chats from the database for a given date.  The start of a Flow is designed to be invoked in two ways.  The first being on a timer basis, so every 30 minutes the ExecuteProcess processor will trigger for the current date. The second is via the ListenHTTP processor. The ListenHTTP creates a HTTP endpoint that can be called if we want to trigger the flow for a specific date. Below is an example of triggering the flow via curl for example:

curl -X POST -H 'Content-Type: application/json' -H 'chat_date:2016-12-20' 
--data "invoked chat sync" <nifi-server>:8082/chatSyncListener

Below is a screen shot of the complete flow for the extract:


One thing to note on the chat extract, an UpdateAttribute processor is connected to the output of the RouteOnAttribute processor. This is being used to add various attributes/metadata to the Flowfile, which will be used in downstream processors to aid with loading of the data into the correct BigQuery project/table and table partition. 


The second stage of the pipeline is kicked off automatically once data is sent into the "output port". You connect process groups together via output/input port components. Since all the data that is extracted from the database via the ExecuteSQL processor will be in Avro format, we'll need to convert the records into JSON records before loading into Big Query. This is accomplished very easily with the ConvertAvroToJSON processor. 


The ExecuteStreamCommand processor labeled "parse zendesk chats" runs the jar file that actually parses all the raw incoming chat events.  I've blogged about using Instaparse for the parsing previously, you can read about it in more detail here.  The output of this processor is sent downstream to the next processor in the flow, the "format chats for big query".  This step leverages JQ to reformat the JSON; converting the "chat-line-timestamp" into a UNIX timestamp along with renaming various fields.  


JSON content before the ExecuteStreamCommand:

{"chat-date":"2016-12-20","ticket-id":"64085","chat-line-timestamp":"02:19:50 PM","chatter":"Joe","chat-line":"Good morning.","created-at":"2016-12-20 02:19:50 PM"}
{"chat-date":"2016-12-20","ticket-id":"64085","chat-line-timestamp":"02:19:58 PM","chatter":"Susan","chat-line":"Good morning Joe!","created-at":"2016-12-20 02:19:58 PM"}
{"chat-date":"2016-12-20","ticket-id":"64085","chat-line-timestamp":"02:20:00 PM","chatter":"Susan","chat-line":"How are you?","created-at":"2016-12-20 02:20:00 PM"}
{"chat-date":"2016-12-20","ticket-id":"64085","chat-line-timestamp":"02:20:12 PM","chatter":"Joe","chat-line":"Great. I have a quick question on Dashboards this morning.","created-at":"2016-12-20 02:20:12 PM"}

JSON content after the ExecuteStreamCommand:


{"ticket_id":"64085","chatter":"Joe","chat_line":"Good morning.","created_at":1482243590}
{"ticket_id":"64085","chatter":"Susan","chat_line":"Good morning Joe!","created_at":1482243598}
{"ticket_id":"64085","chatter":"Susan","chat_line":"How are you?","created_at":1482243600}
{"ticket_id":"64085","chatter":"Joe","chat_line":"Great. I have a quick question on Dashboards this morning.","created_at":1482243612}


The final stages of the flow is the loading of the data into BigQuery.  This step is triggered via the ListFile processor which listens for files being dropped into a directory. The ListFile processor will maintain state so the same file will not be listed/processed twice. Since I needed to embed a project id, table name, and partition into the filename,  another UpdateAttribute processor is needed to parse and extract those back into Flowfile attributes. These attributes will then be used by the downstream ExecuteScript processor.  Nifi has a pretty rich Expression Language that can be used for such tasks quite easily.

I happen to be using Groovy to wrap the Google Big Query command line tool. Once I define the flowFile session via session.get(), one can access the flowFile attributes by calling the getAttributes() method on the session object.


def flowFile = session.get();

if (flowFile == null) {
    return;
}
def attributes = flowFile.getAttributes()
  
Now we're able to leverage the bq command line tool to upload the file and load the data into the correct project, table and table partition. I'm calling bq by using the Groovy's executeOnShell method.  If we do get a failure loading Big Query, a notification is sent to text and email me via AWS SNS and I set the processor status to failure via:


session.transfer(flowFile, REL_FAILURE)


There are a number of features and capabilities that make NiFi great for dataflows, but one of those really nice features is data provenance. Tracking a dataflow from beginning to end is critical.  Nifi makes it easy to gain insight into each step within a given ETL flow. This really helps when you need to debug when the happy path becomes not so happy.  For example, by right clicking on the ExecuteScript, and selecting Data Provenance and View Details, we can see the output of the Big Query load.


The use of NiFi is expanding quickly here at Looker. The seamless experience between design, control, feedback, and monitoring make for a very powerful tool in any data engineering toolkit. 


So there you have it, Bob's your uncle!


Keeping in-sync with Salesforce

Keeping two or more data stores in-sync is always a fun task. With the help of Apache NiFi and some decently tooling, I've been able to...